This post contains affiliate links. If you make a purchase through links on our site, I may earn a small commission. Click to see full details of my Privacy Policy.
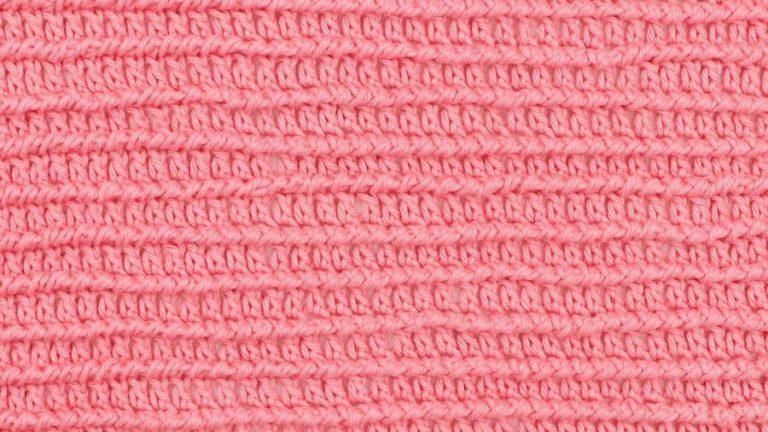
In this tutorial, you’ll learn how to crochet the rice stitch step by step, with a free written pattern and video tutorial to guide you through the technique. The rice stitch combines simple crochet stitches to create its distinctive texture, making it a great stitch to add to your crochet skills.
The rice stitch crochet pattern is a beautifully textured stitch that creates a subtle, raised design across your crochet fabric. It’s a versatile stitch that works particularly well for blankets, scarves, cushions and other projects where you want to add interest without using a complicated stitch pattern.

Materials & Tools
- Yarn: I used Bella Coco Crochet Super-Soft Chunky yarn which was an exclusive yarn found in my Crochet Society boxes. Alternatively, you could use Stylecraft Special Chunky or Paintbox Yarns Simply Chunky
- Hook: Hook to match yarn and your desired gauge. I used a 5.5mm.
- Scissors
- Darning Needle
Where to Shop Yarn
Terms & Abbreviations
Chain(s): ch(s): Yarn over, pull through loop on the hook.
Slip Stitch(s): ss(s): Insert hook, yarn over, pull through stitch and loop on hook.
Half Treble Crochet(s): htr(s): Yarn over, insert into stitch, yarn over, pull up a loop, you will have three loops on the hook. Yarn over, pull through remaining three loops.
Treble Crochet(s): tr(s): Yarn over, insert into stitch, yarn over, pull up a loop, you will have three loops on the hook. Yarn over, pull through two loops, yarn over, pull through the remaining two loops.
Front Post Treble Crochet(s): fptr(s): Yarn over, insert hook around post of stitch from front to back to front, yarn over, pull up a loop; you will have three loops on the hook. Yarn over, pull through two loops, yarn over, pull through remaining two loops.
Back Post Treble Crochet(s): bptr(s): Yarn over, insert hook around post of stitch from back to front to back, yarn over, pull up a loop; you will have three loops on the hook. Yarn over, pull through two loops, yarn over, pull through remaining two loops.
Unsure of the differences between UK and US terms? Need a refresher on how to do your stitches? In my ‘How to crochet: A handy reference guide’ EBook I help you with all of these terms and you can always have them to hand! You will also get exclusive access to free video instructions. Learn more about the eBook here.
Convert Pattern Terms
Here you can quickly switch between UK and US crochet terms. This will make following the pattern easier as all terms will be converted to your preferred version.
Pattern Notes
Written in UK terms but switchable to US terms below.
Skill Level: Beginner
Stitch Multiple: 2 +3
This pattern gives you the basic principles for the rice stitch, designed to help you create your own projects.
The video tutorial can be found at the base of the post.
Free Crocher Pattern: Rice Stitch
You are viewing this pattern in UK terms.
Chain in multiples of 2 + 3
Row 1: tr in third ch from the hook (skipped 2-ch counts as st), tr in each ch across. Turn.
Row 2: 1 ch (does not count as a st here and throughout), htr in first st, *FPtr around next st, BPtr around next st, rep from * until 2 sts rem, FPtr, htr in last st. Turn.
Rep Row 2 until desired height.
Fasten off and sew in ends.
Video Tutorials
Below you can find the left and right handed version of this tutorial. Don’t forget to subscribe to my channel 🙂
Right-handed
Or you can watch on YouTube
Left-handed
Or you can watch on YouTube
Crochet Stitches To Try Next
Join Our Crochet Community
Let’s Stay Connected!
I always love to see your makes so if you try any of my patterns or follow my stitch tutorials please tag me @bellacococrochet or use the #bellacococrochet
FAQs
Is this stitch suitable for beginners?
I always say if you like the look of a stitch, try it. If you’re comfortable with basic stitches like chain, double crochet, or treble crochet, you’ll likely pick it up quickly. I also recommend watching the video tutorial alongside following the written pattern. Lastly, take your time, practice slowly, and don’t worry if it feels tricky at first.
How do I keep count of my stitches?
Using stitch markers can make a huge difference, especially at the beginning and end of rows or rounds. Counting regularly after each row will also help you spot mistakes early before they become harder to fix. If you’re still struggling, add stitch markers after every 5 or 10 stitches.
My edges are uneven! What am I doing wrong?
Uneven edges usually happen when stitches are accidentally added or missed at the ends of rows. Pay close attention to where the first and last stitches go, and count your stitches often to make sure the total stays consistent. Using stitch markers can help with this. CLICK HERE for more help starting and ending rows with confidence.
What should I do if I make a mistake?
Mistakes happen to every crocheter! If you notice an error a few stitches back, gently pull out the stitches to the problem area and try again. In the crochet world, we call this frogging, and it’s all part of the learning process.
Why do my stitches vary in size?
This will be your tension. If you struggle with your tension and find your crochet stitches are inconsistent, or they get tighter or looser, I can help fix this with the golden loop! CLICK HERE to help fix your tension issues.
How long does it take to learn a new crochet stitch?
Some stitches click immediately, while others take a little more practice. Give yourself time to repeat the stitch pattern slowly, and don’t be afraid to pause and replay tutorials. Practice makes progress.


Love this!!!