
This post contains affiliate links. If you make a purchase through links on our site, I may earn a small commission. Click to see full details of my Privacy Policy.
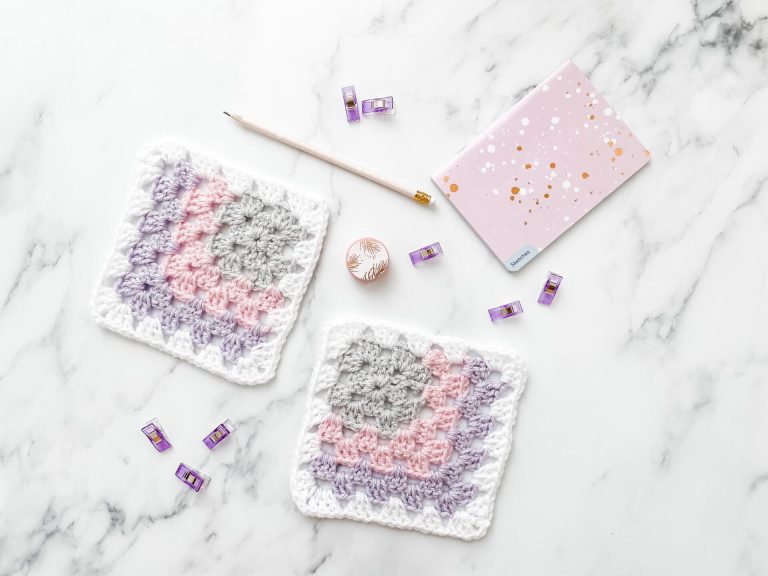
Learn how to crochet a mitered solid granny square with my free step-by-step pattern and video tutorial. If you love the timeless appeal of granny squares but want to try something with a contemporary edge, the mitered solid granny square is a perfect project to explore. With its clean lines and clever corner shaping, this square offers a striking diagonal design that adds a bold, modern look to your makes. This granny square is an adaptation of the mitered granny square.
In this post, we’ll guide you through the basics of creating your own mitered solid granny square.


What is a Mitered Granny Square?
Unlike traditional granny squares that work outward from the centre in even layers, the mitered solid granny square shifts the focus with a diagonal construction, making it ideal for geometric patterns, colour blocking, or simply adding visual interest to your next blanket, bag, or cushion.
Pattern Use Ideas
- Blanket
- Cushion
- Garment
- Tote Bag

materials & tools
- Yarn: You can use any weight yarn, I’d recommend a DK or Aran in 2 or more colours to achieve the abstract effect.
- Hook: check the band of your chosen yarn for the recommended hook size.
- Darning Needle
- Scissors
Where to Shop for Yarn

Convert Pattern Terms
Here you can quickly switch between UK and US crochet terms. This will make following the pattern easier as all terms will be converted to your preferred version.
pattern notes
This pattern is written in UK terms but switchable to US crochet terms below.
terms & abbreviations
Chain (ch): Yarn over, pull through.
Treble Crochet(s): tr(s): Yarn over, insert into stitch, yarn over, pull up a loop, you will have three loops on the hook. Yarn over, pull through two loops, yarn over, pull through remaining two loops.
Slip stitch: ss: Insert hook, yarn over, pull through both stitch and loop on hook.
Stitch(es) (st/s)

Unsure of the differences between UK and US terms? Need a refresher on how to do your stitches? In my ‘How to crochet: A handy reference guide’ EBook I help you with all of these terms and you can always have them to hand! You will also get exclusive access to free video instructions. Learn more about the eBook here.
pin for later

Free Pattern: mitered solid granny square


You are viewing this pattern in UK terms.
1-3
- With colour A, ch 3, join with a ss into first ch to make a circle. Alternatively, you could use a magic circle.
- Round 1 (RS): 3 ch (counts as tr here and throughout), into ring work 2 tr, 2 ch, 3 tr, 2 ch] three times, join with ss into top of 3-ch. Turn. (12 tr, 4 ch sps.)
- Round 2 (WS): 3 ch, [2 tr, 2 ch, 2 tr] in corner 2-ch sp, *tr in next 3 sts, [2 tr, 2 ch, 2 tr] in corner 2-ch sp, rep from * twice more, tr in next 2 sts, join with ss into top of 3-ch. Fasten off. Turn. (28 tr, 4 ch sps.)
- Join yarn B in any corner 2-ch sp with ss.
- Mitre Row 1 (RS): 3 ch, tr into same ch sp, tr in each st to corner ch sp, [2 tr, 2 ch, 2 tr] in ch sp, tr in each st to corner ch sp, 2 tr in ch sp, leave rem sts unworked. Turn. (22 tr, 1 ch sp.)
You are viewing this pattern in UK terms.
4-6
- Mitre Row 2 (WS): 3 ch, tr in each st to corner ch sp, 2 tr, 2 ch, 2 tr] in ch sp, tr in each st to end. Fasten off. Turn. (26 tr, 1 ch sp.)
- Join yarn C in top of last st from previous row with ss.
- Mitre Row 3: 3 ch, tr in each st to corner ch sp, [2 tr, 2 ch, 2 tr] in ch sp, tr in each st to end. Turn.
(30 tr, 1 ch sp.) - Mitre Row 4: 3 ch, tr in each st to corner ch sp, [2 tr, 2 ch, 2 tr] in corner ch sp, tr in each st to end. Fasten off. Turn. (34 tr, 1 ch sp.)
- Rep Mitre Rows 3 and 4 until desired size, turning work after completing each row and changing yarn colours every two rows.
- Fasten off and sew in ends.
Border & Finsihing Off
- Border: With right side facing. Attach Colour D into top of last st from previous round with ss. Ch 3, tr in same stitch and each st to the corner ch-2 sp. (2 tr, ch 2, 2 tr) in corner ch-2 sp. Tr in each st until you have one remaining. (2 tr, ch 2, 2 tr) in last st. Work 2 tr around each post and 1 tr in each stitch along the raw edge. (2 tr, ch 2, 2 tr) in corner ch-2 sp. Work 1 tr in each stitch and 2 tr around each post along the raw edge. Work 2 tr in to the same st as first st of the round, ch 2 and join with a ss to beginning ch 2. Tie off.
- Sew in ends.
Changing Colours
Do you need help with changing colours? Check out my tutorial below:

video tutorials
Right-handed
Or you can watch on YouTube
Left-handed
Or you can watch on YouTube

Crochet Granny Squares to Try Next


- Mitered Granny Square
- Sunburst Granny Square
- Heart Granny Square
- Circle of Hope Granny Square
- Bobble Circle Granny Square





IT IS THE SAME DC, V STITCH IN CORNERS , LIKE YOUR MITERED SQUARE, BUT NOT NOT THE NO WAY TO GET IT STARTED IN THE MIDDLE AS EVERYTHING IS ANGLED
I love how you explain all the stitches so clearly