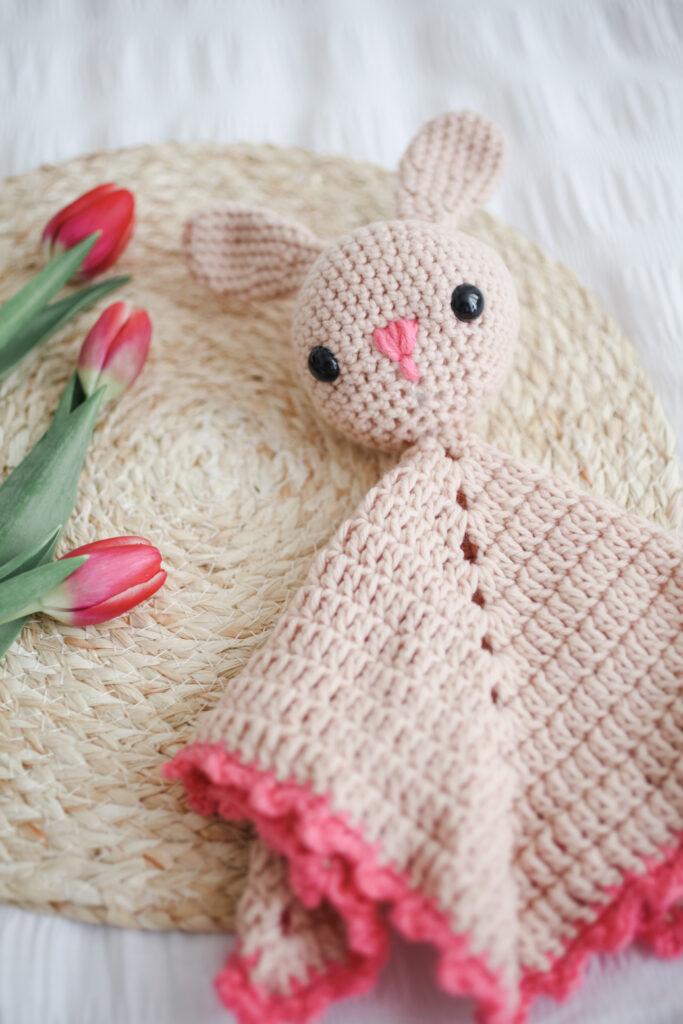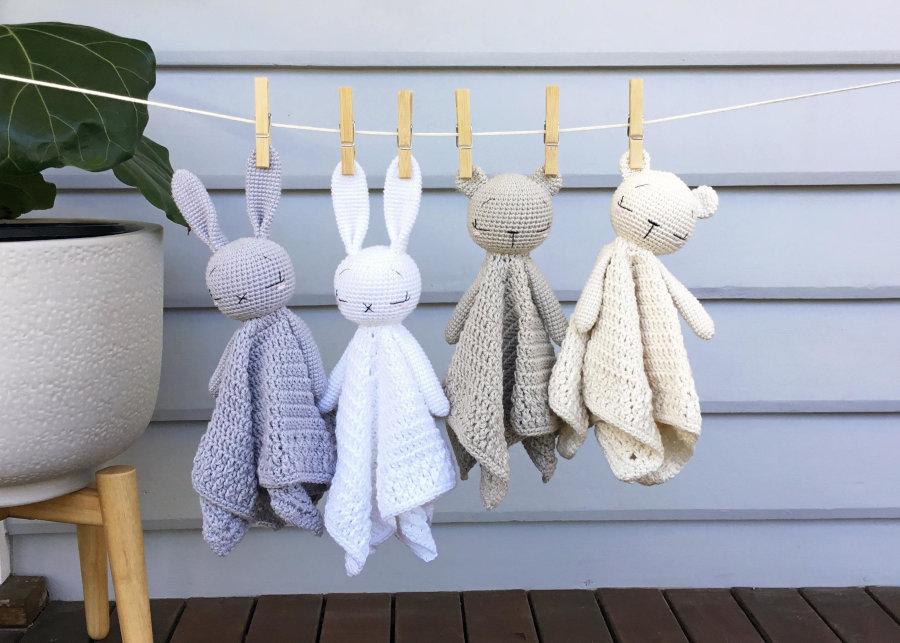
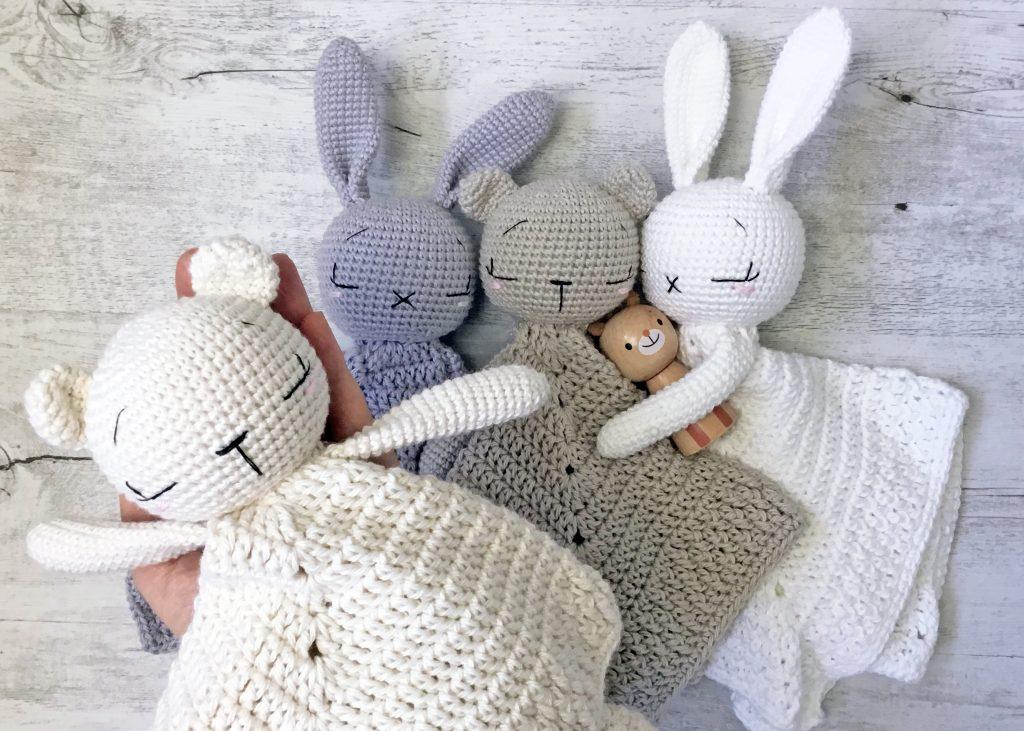
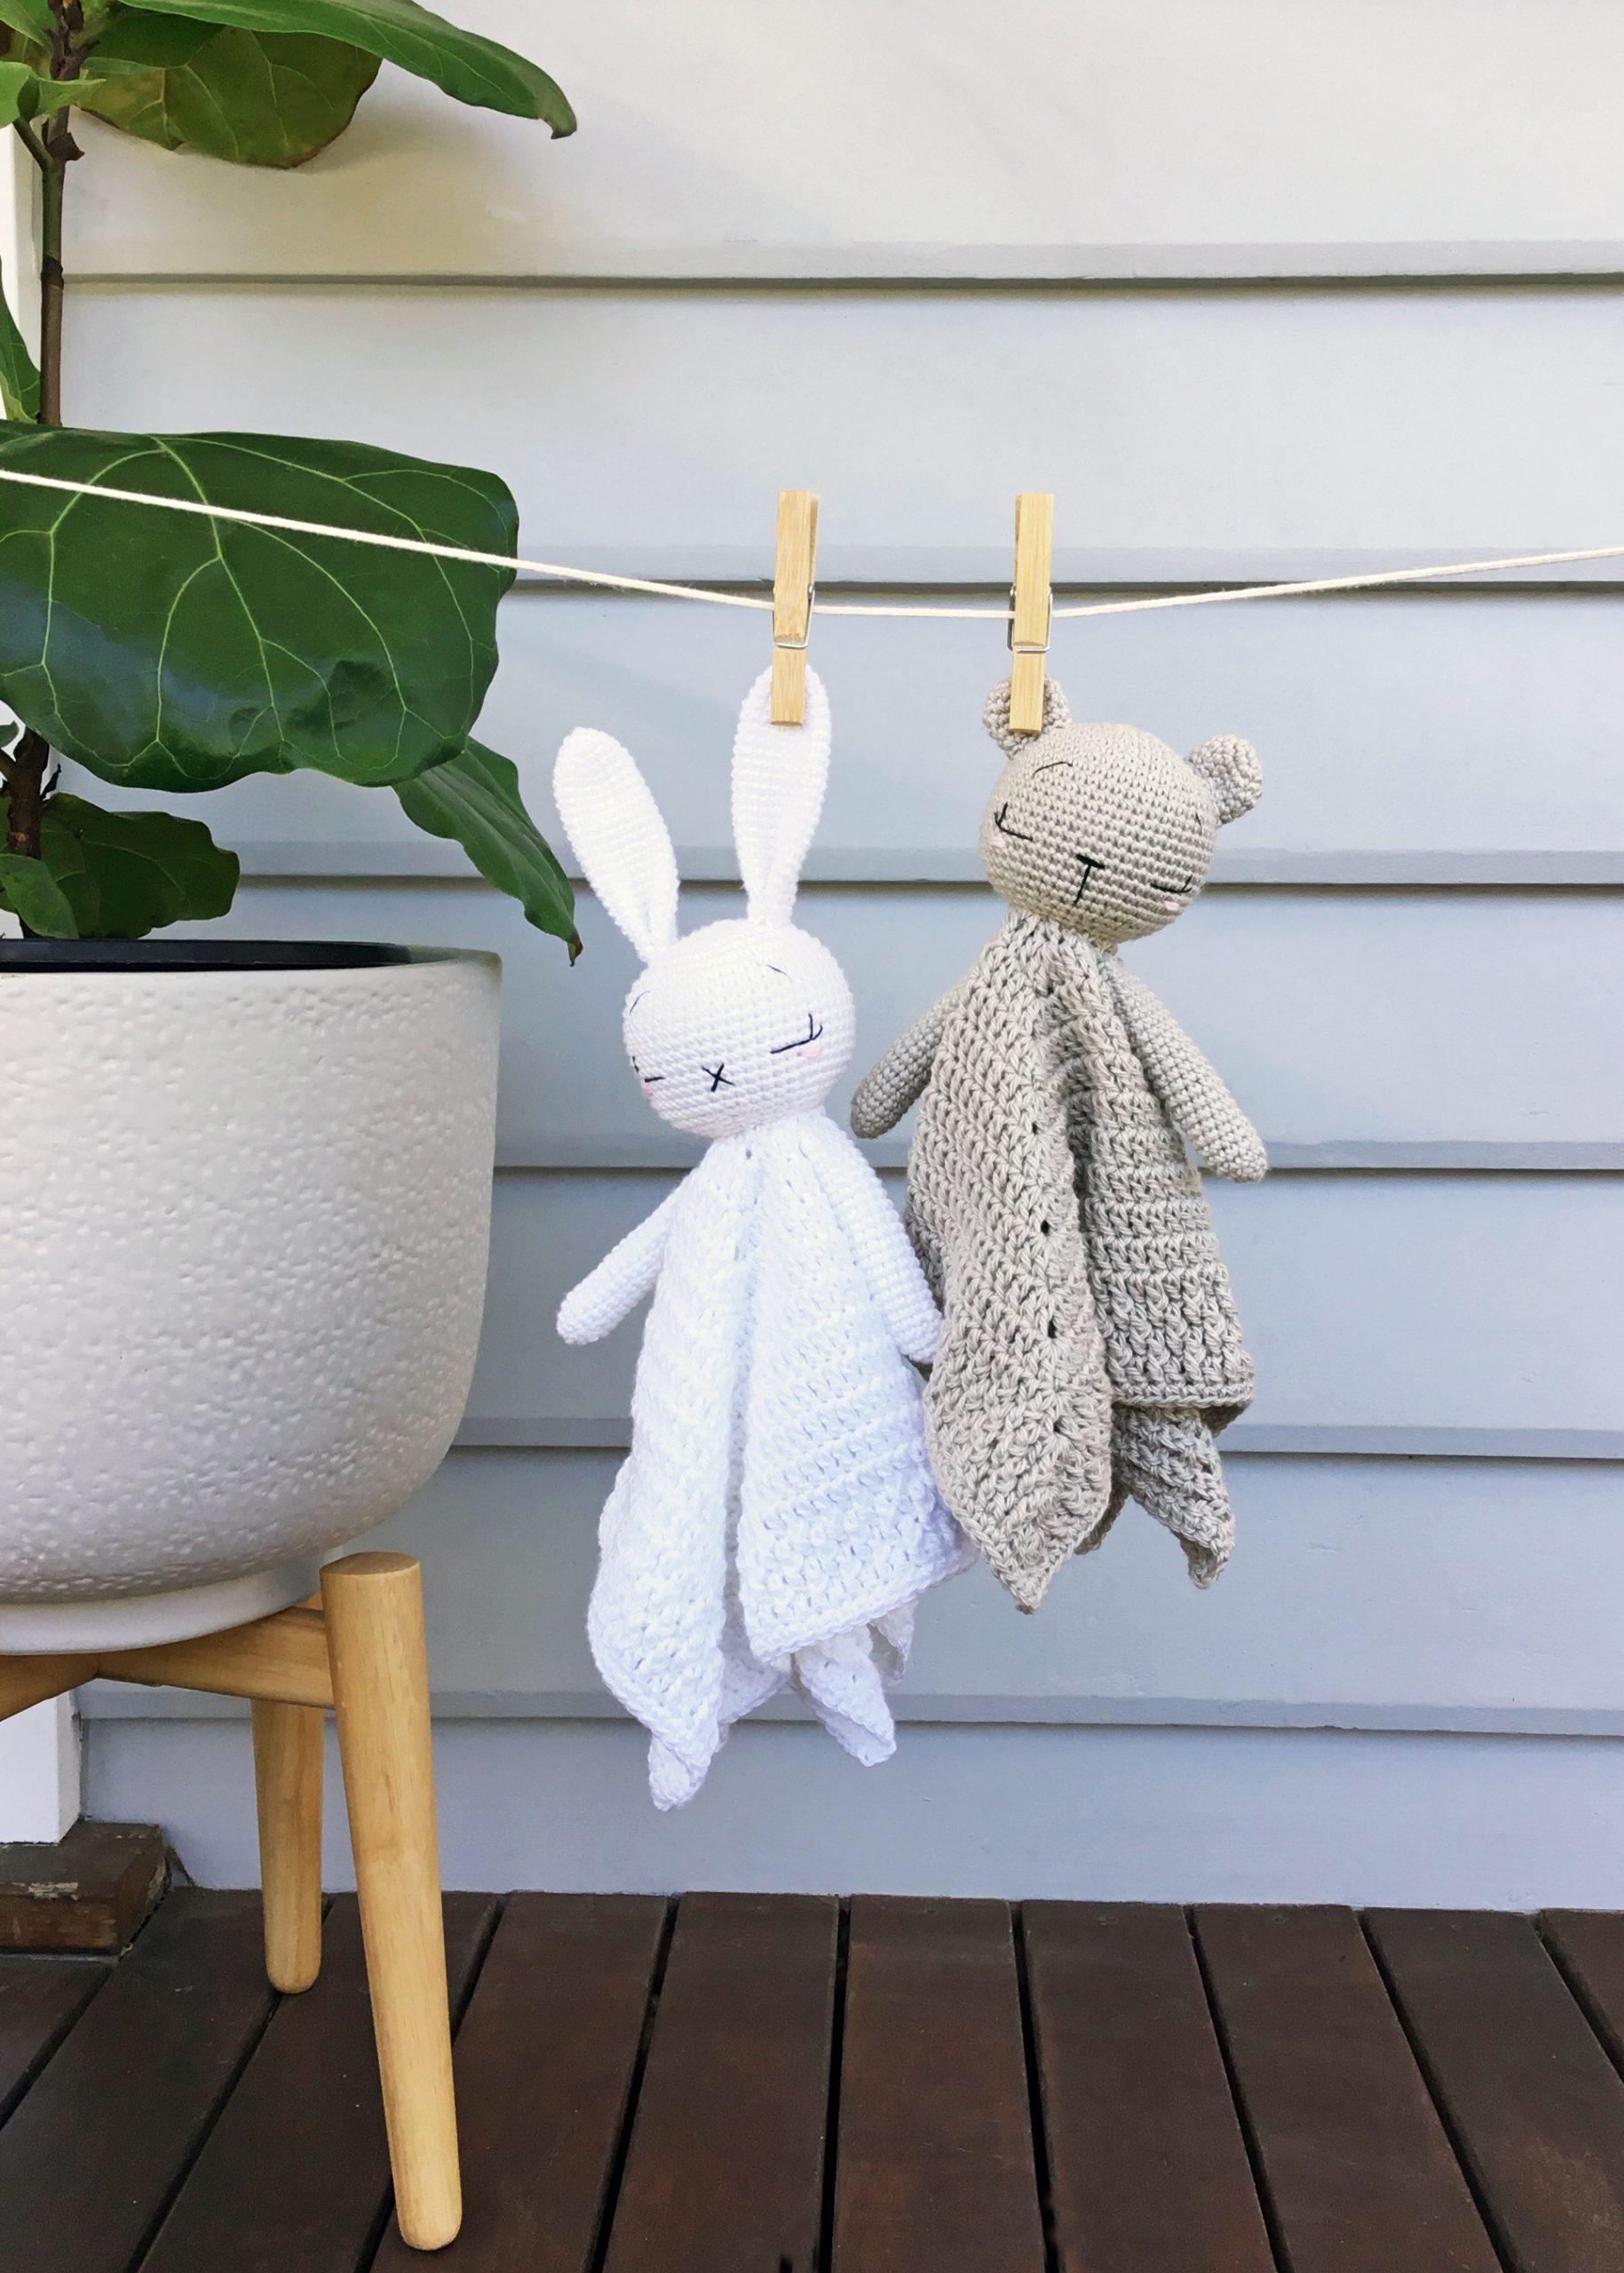
Crochet an interchangeable lovely blanket. The lovely Alanna O’Dea from @theodoreandrose has created these adorable patterns that make the perfect beginners’ project for any budding Amigurumi crocheters.
“As this is a guest post, Bella Coco Crochet is unable to answer any queries. If you have a question, please contact the designer directly and they will be happy to help you.”
Materials and Tools needed
- Yarn: The example bunny and bear loveys were made using Heirloom Cotton 8 ply (120m/50g) in the following colours: Bear lovey yarn used: Oat (6630) and Parchment (6617) approx 100g (per comforter)
- Bunny lovey yarn used: Glacier (6619) and Snow (6607) approx 110g (per comforter)
- Pink yarn for cheeks. Only small amounts of yarn is required for the cheeks so leftover yarn can be used.
- Black embroidery thread for eyes and nose.
- Hook: 2.25mm (US B/1) and 4mm (US G/6)
- Toy stuffing approx 35-40g
- Stitch marker
- Scissors
- Darning Needle

pattern Notes and gauge
- Skill level: beginner
- Written in UK terms
- When working amigurumi parts (head and ears), work in continuous spirals, without closing off the rounds with a slip stitch.
- Use a stitch marker at the beginning of each round. This helps when counting your stitches to compare it with the pattern.
- To help you when sewing pieces together, first pin them into place and check that you are happy with the positioning.
gauge and finished size
- Blanket gauge: 19 stitches and 9 rows in a treble crochet = 10cm x 10cm
- Amigurumi gauge : 5 rounds = 3.7cm across (Note: crochet the first 5 rounds of the head pattern to use as a gauge swatch).
- Finished size: The finished blanket is approx 33cm x 33cm; the head is approx 22cm in diameter.
Stitches and Abbreviations
- Space: sp
- Stitche(s): st/s(s)
- Magic ring: MR
- Beginning: beg
- Chain: ch(s): Yarn over, pull through.
- Slip stitch (sl-st): sl-st: Insert hook, yarn over, pull through both stitch and loop on hook.
- Back loop only: BLO: Insert hook into back loop of the stitch only.
- Double crochet: dc(s): Insert hook into stitch, yarn over, pull up a loop, you will have two loops on the hook. Yarn over, pull through remaining two loops.
- Double crochet increase: dc inc: Make two complete double crochets (dc) into the same stitch.
- Double crochet invisible decrease: dc dec: Insert hook into front loop only of next two stitches, yarn over, pull through, you will have two loops on the hook. Yarn over and pull through both loops on the hook.
stitches continued…
If you are an absolute beginner you might not have tried these techniques, I’ve linked some of the techniques to assisting video tutorials to help you.
- Double Treble Crochet: dtr(s): Yarn over hook twice, insert hook into stitch, yarn over, pull up a loop, you will have four loops on the hook. Yarn over, pull through two loops, you will have three loops on the hook. Yarn over, pull through two loops, yarn over, pull through remaining two loops.
- Front loop only: FLO: Insert hook into front loop of the stitch only.
- Front Post Treble Crochet: fptr: Yarn over, insert hook into front post from right to left (or left to right if you are left-handed), yarn over, pull up a loop, you will have three loops on the hook. Yarn over, pull through two loops, yarn over, pull through remaining two loops.
- Half Treble Crochet: htr(s): Yarn over, insert hook into stitch, yarn over, pull up a loop, you will have three loops on the hook. Yarn over, pull through all three loops.
- Treble crochet: tr(s): Yarn over, insert hook into stitch, yarn over, pull up a loop, you will have three loops on the hook. Yarn over, pull through two loops, yarn over, pull through remaining two loops.
Unsure of the differences between UK and US terms? Need a refresher on how to do your stitches? In my ‘How to crochet: A handy reference guide’ EBook I help you with all of these terms and you can always have them to hand! You will also get exclusive access to free video instructions. You can find my EBook HERE.
pin for later
“The inspiration behind this pattern was a combination of the stunning neutral palette of the Heirloom Cotton 8 I had in my yarn stash, as well as the fact that my boys both adored their little loveys as babies. They went with us everywhere – the car, the pram, the shops…Grandma and Grandad’s house – EVERYWHERE!! So, I wanted to create something that was just as adorable, safe for babies and toddlers to sleep with, durable and easy to care for, and specifically with a beginner crocheter in mind.”
Alanna
interchangeable lovely blanket Pattern
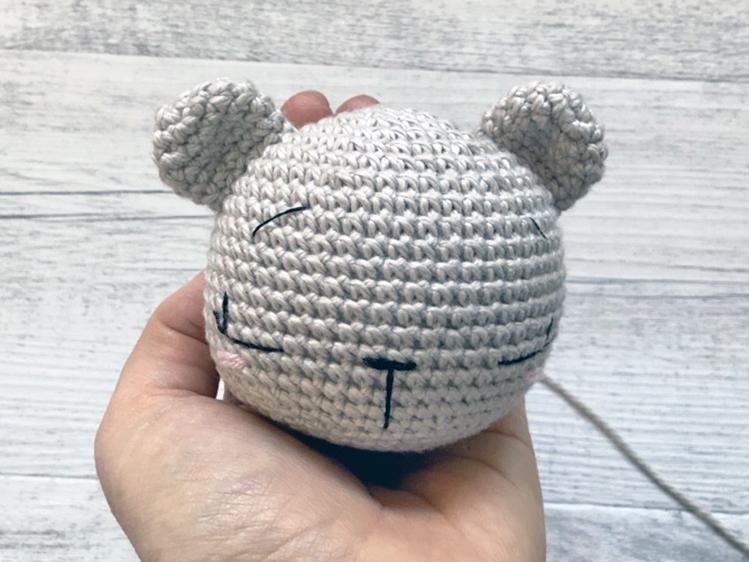
The Head
- Using a 2.25mm (US B/1) hook and chosen yarn, make a magic ring.
- Rnd 1: ch1, dc 6 into ring. Pull the ring tightly closed. (6 sts)
- Rnd 2: dc inc in all 6 sts (12 sts)
- Rnd 3: [dc in next st, dc inc in next st] x6 (18 sts)
- Rnd 4: [dc in next 2 sts, dc inc in next st] x6 (24 sts)
- Rnd 5: [dc in next 3 sts, dc inc in next st] x6 (30 sts)
- Rnd 6: dc in next 2 sts, dc inc in next st, [dc in next 4 sts, dc inc in next st] x5, dc in next 2 sts (36 sts)
Weave in starting yarn tail.
- Rnd 7: [dc in next 5 sts, dc inc in next st] x6 (42 sts)
- Rnd 8: dc in next 3 sts, dc inc in next st, [dc in next 6 sts, dc inc in next st] x5, dc in next 3 sts (48 sts)
- Rnd 9-19: dc in all 48 sts (11 Rnds)
- Rnd 20: dc in next 3 sts, dc dec, [dc in next 6 sts, dc dec] x5, dc in next 3 sts (42 sts)
- Rnd 21: [dc in next 5 sts, dc dec] x6 (36 sts)
- Rnd 22: dc in next 2 sts, dc dec, [dc in next 4 sts, dc dec] x5, dc in next 2 sts (30 sts)
- Rnd 23: [dc in next 3 sts, dc dec] x6 (24 sts)
- Rnd 24: [dc BLO in next 2 sts, dc dec BLO] x6 (18 sts)
Note: This BLO round will act as a guide when attaching the head to the blanket.
stuffing
Stuff the head firmly. Insert small amounts at a time until you get the right shape. Stuffing your toy can be tricky, but it is a very important step in getting the right shape and look for your toy.
Overstuffing might stretch the fabric too far and show gaps and understuffing will give your piece a deflated look. Take your time with this step.
- Rnd 25: [dc in next st, dc dec] x6 (12 sts)
- Rnd 26: dc dec x6 (6 sts)
Leaving a long yarn tail (about 30cm) for sewing the head to the blanket later, break the yarn and pull through. Weave the yarn tail through the FLO of round 26 and pull firmly to close off the head.
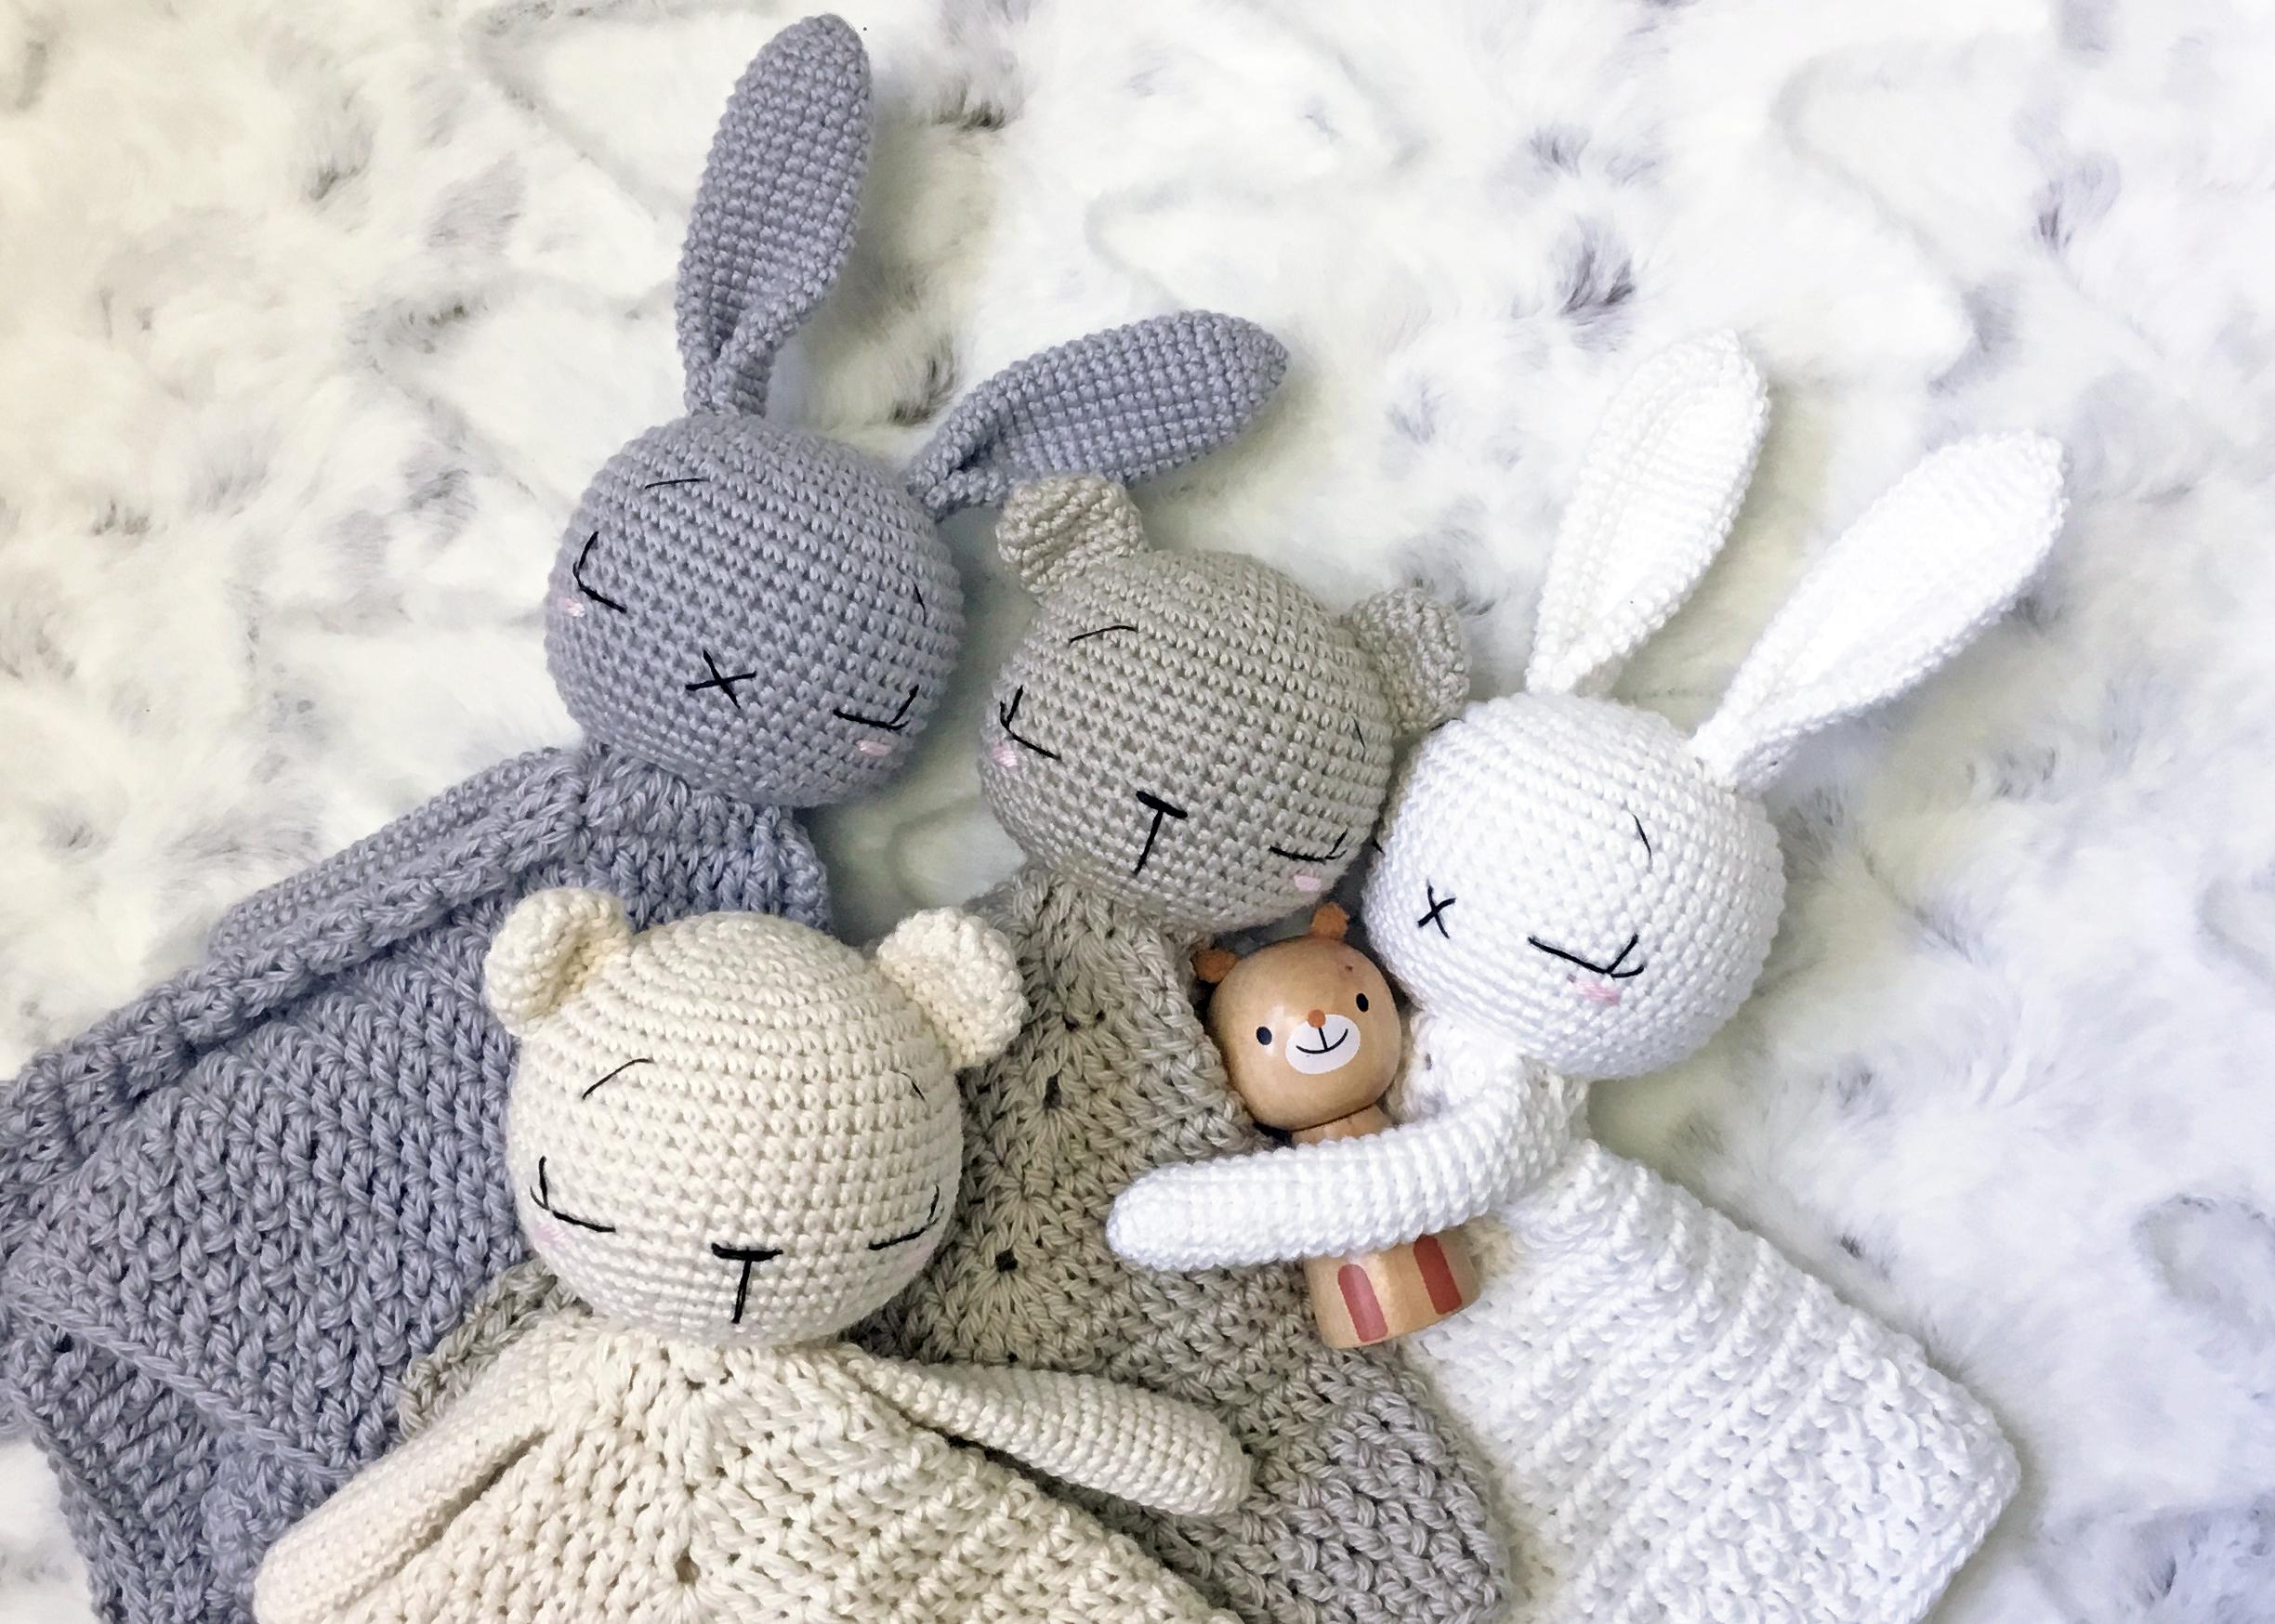
Bunny Ears (make 2)
- Using a 2.25mm (US B/1) hook and chosen yarn, make a magic ring.
- Rnd 1: ch1, dc 6 into ring. Pull the ring tightly closed. (6 sts)
- Rnd 2: [dc in next st, dc inc in next st] x3 (9 sts)
- Rnd 3: [dc in next 2 sts, dc inc in next st] x3 (12 sts)
- Rnd 4: [dc in next 3 sts, dc inc in next st] x3 (15 sts)
- Rnd 5: [dc in next 4 sts, dc inc in next st] x3 (18 sts)
- Weave in starting yarn tail.
- Rnd 6-23: dc in all 18 sts (18 sts) (18 Rnds)
Leaving a long tail of yarn for sewing the ears to the head later, break the yarn and pull through.
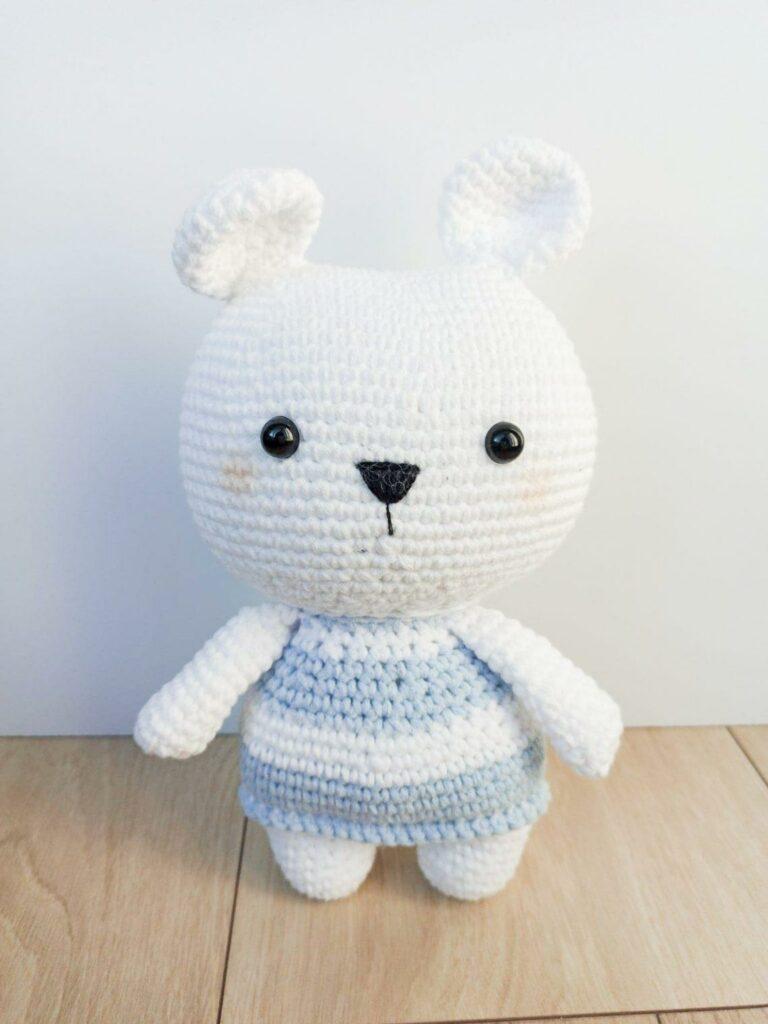
Bear Ears (make 2)
- Using a 2.25mm (US B/1) hook and chosen yarn, make a magic ring.
- Rnd 1: ch1, dc 6 into ring. Pull the ring tightly closed. (6 sts)
- Rnd 2: dc inc in all 6 sts (12 sts)
- Rnd 3: [dc in next st, dc inc in next st] x6 (18 sts)
- Rnd 4: dc in all 18 sts (18 sts)
- Weave in starting yarn tail.
- Rnd 5: [dc in next st, dc dec] x6 (12 sts)
- Rnd 6: dc in all 12 sts (12 sts)
Leaving a long tail of yarn for sewing the ears to the head later, break the yarn and pull through.
arms (make 2)
- Using a 2.25mm (US B/1) hook and chosen yarn, make a magic ring.
- Rnd 1: ch1, dc 6 into ring. Pull the ring tightly closed. (6 sts)
- Rnd 2: [dc in next st, dc inc in next st] x3 (9 sts)
- Rnd 3: [dc in next 2 sts, dc inc in next st] x3 (12 sts)
- Weave in starting yarn tail.
- Rnd 4-22: dc in all 12 sts (12 sts) (19 Rnds)
Don’t forget to leave a long tail of yarn, break the yarn and pull through. Fill the first third of the arm with a little lightly packed toy stuffing. Sew the top of the arm closed with the yarn tail. Leave yarn tail attached for sewing arms to blanket later.

lovey Blanket
Using a 4mm (US G/6) hook and chosen yarn, make a magic ring.
steps: 1-11
- Rnd 1: ch 4 (counts as first dtr throughout), into MR work 4 tr, [dtr, 4 tr] x3. Pull ring closed. Join round with a sl-st into top of beg ch 4. Note dtr stitch forms corners. (20 sts)
- Rnd 2: ch 4, work 2 tr in corner dtr, [tr in next 4 sts, (2 tr, dtr, 2 tr) in corner dtr} x3, tr in next 4 sts. Work 2 tr into first corner dtr to finish. Join round with a sl-st into top of beg ch 4. (36 sts)
- Rnd 3: ch 5 (counts as 1 tr and a ch 2 sp throughout), work 2 tr into same corner dtr. * Work 1 tr into next 8 sts, into corner dtr work (2 tr, ch 2, 2 tr) * Repeat *…* 3 times. Work 1 tr into next 8 sts, to finish work 1 tr into first corner dtr. Join round with a sl-st into 3rd ch of beg ch 5. (48 sts, 4 ch 2 sp)
- Rnd 4: sl-st into ch 2 sp, ch 4, work 2 tr into same sp. * Work 1 tr into next 12 sts, into ch 2 sp work (2 tr, dtr, 2 tr) * Repeat *…* 3 times. Work 1 tr into next 12 sts, to finish work 2 tr into first ch 2 sp. Join round with a sl-st into top of beg ch 4. (68 sts)
- Rnd 5 – 11: Repeat rounds 3 and 4, alternating between the two – an open ch 2 corner group (Rnd 3) and a solid dtr corner group (Rnd 4). Note: the number of sts worked across between corners will increase by 4 with each round. You should finish on a ch 2 corner group (as per Rnd 3).
12-13
The next 3 rounds (Rnd 12-14) will make up the alpine stitch border using fptr and tr crochet stitches.
- Rnd 12: sl-st into ch 2 sp, ch4, work 2 tr into same sp. [ * Work a fptr around first tr post, into next st work 1 tr * Repeat *…* all the way along until you reach the next ch 2 sp (you should finish with a tr). Into ch 2 sp work (2 tr, 1 dtr, 2 tr) ] Repeat […] 3 more times. Next work *…* into all st across. To finish work 2 tr into first ch 2 sp. Join round with a sl-st into top of beg ch 4. (196 sts)
- Rnd 13: ch 5, work 2 tr into same corner dtr. [ * Work a tr into next st, then work a fptr around next tr post * Repeat *…* all the way along until you reach the next corner dtr (you should finish with a fptr). Into corner dtr work (2 tr, ch 2, 2 tr) ]. Repeat […] 3 more times. Next work *…* into all stitches across. To finish work 1 tr into first corner dtr. Join round with a sl-st into 3rd ch of beg ch 5. (208 sts, 4 ch 2 sp)
14-15
- Rnd 14: sl-st into ch 2 sp, ch4, work 2 tr into same sp. [ * Work a fptr around first tr post, into next st work 1 tr * Repeat *…* all the way along until you reach the next ch 2 sp (you should finish with a tr). Into ch 2 sp work (2 tr, 1 dtr, 2 tr) ] Repeat […] 3 more times. Next work *…* into all st across. To finish work 2 tr into first ch 2 sp. Join round with a sl-st into top of beg ch 4. (228 sts)
- Rnd 15: ch2 (counts as first hdr), dc into same st, * dc into each st across, into corner dtr work (2 dc, htr, 2 dc) * Repeat *…* 3 times. Work 1 dc into each st across, into corner tr work 2 dc. Join round with a sl-st into top of beg ch 2. (244 sts)
- Break the yarn and pull through. Weave in all yarn tails.
Embroidery Work
Pattern Note: I have chosen to use an X stitch for the amigurumi parts (head and ears), which gives a tighter, neater finish. The standard V stitch can be used, however if used it will result in a slightly larger head size.
Embroider the eyes, nose and eyebrows on to the head with black thread. I placed the eyes and the top of the nose between rounds 16 and 17 with 9 stitches between the eyes. Use pink yarn to add little pink cheeks under the eyes.
TIP: Bring the yarn up from the base of the head and return thread to the base when finished. Here you now can easily secure the yarn tails and the blanket will hide it all later for a professionally neat finish.
Construction
bunny
If making the bunny, pinch the base of the ears together and secure with a few stitches. Sew the ears to the top of the head between rounds 5 and 6 on either side.
bear
For the bear, sew the ears to the top of the head between rounds 6-10 on either side.
blanket: step 1
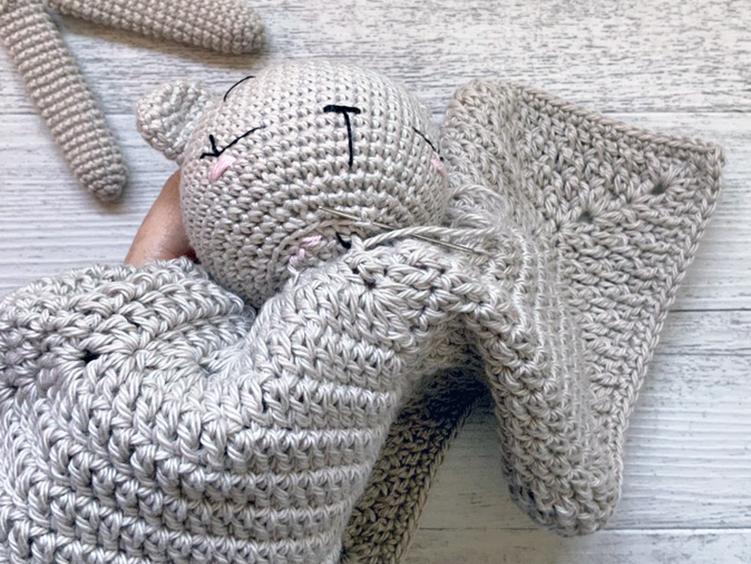
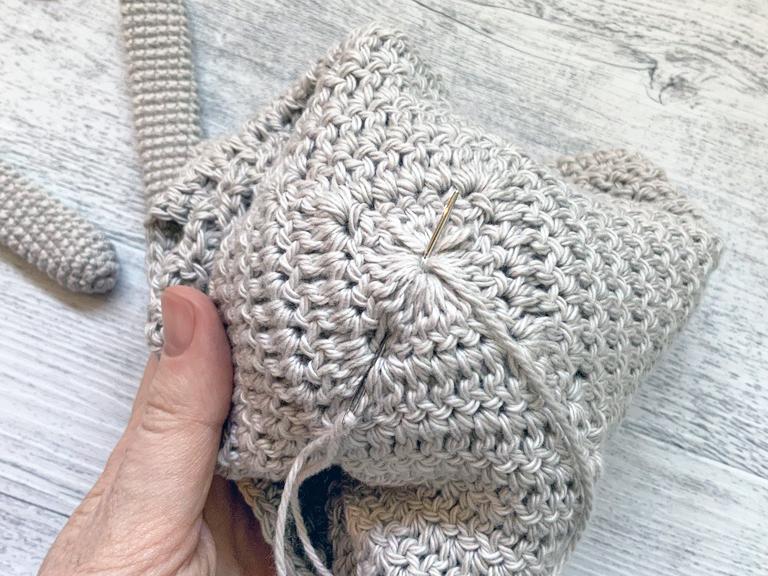
Lay the blanket flat and position the head on the blanket with the face centered on a diagonal with the blanket seam (starting point of each round) at the back. (Step 1). Carefully pin into position, turn your work over and using the long yarn tail from the head, sew an ‘X’, being sure to pass through both the blanket and the head together. (Step 2)
step 2: blanket
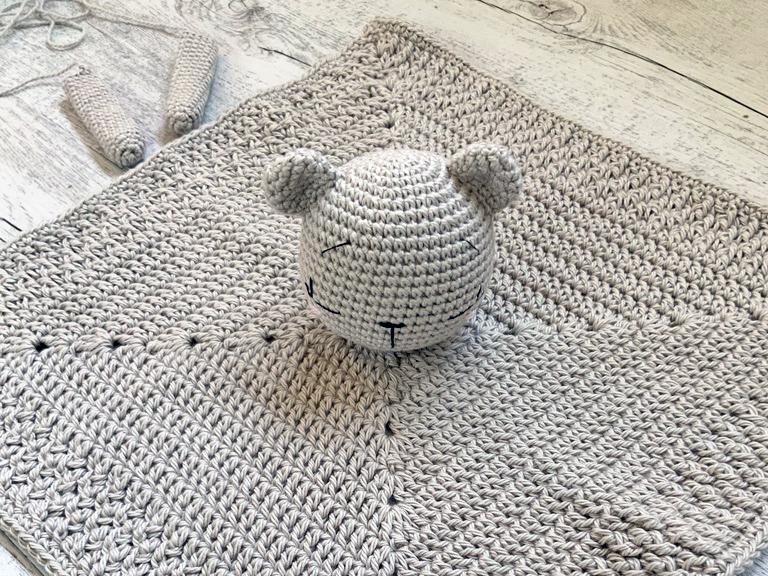
Next, turn your work again to begin sewing the blanket to the head from the right side. Use BLO round (Rnd 24) as a guide, picking up a stitch just above this round as shown in Step 3. When you have made your way all around the head, secure and weave in the yarn tail.
Position the arms and sew securely to the blanket.
Congratulations!!! Your sleepy baby lovey is finished. I hope you enjoyed making them as much as I enjoyed creating them for you
Copyright
This document and the pattern contained within is the property of Alanna O’Dea (Theodore and Rose). Permission has been given for the publishing of this pattern on the Bella Coco website. The resale, copying or sharing (including online) of this document and the pattern within is not allowed. You may sell your completed sleepy baby bear and bunny comforters, but credit should be made to the designer.
Please enjoy this pattern & respect copyright
more patterns
Whether you love making loveys, amigurumi or all things baby there are so many available on the blog for you to try. CLICK HERE to view the patterns. Also, check out these patterns below that I think you’ll love. Starting with another pattern by the talented Alanne of @theodoreandrose Sleepy Baby Bear and Bunny Head Rattle Sticks.