This post contains affiliate links. Click to see full details of my Privacy Policy.
When the lovely Hayley from Hello Moon Crochet contacted me about her Bobble C2C blanket design, I KNEW I had to feature it. Not only is it absolutely BEAUTIFUL, it also features three of my favourite things, bobbles, pompoms and a C2C blanket. There’s a lot to love there!
Hayley is no stranger to the Bella Coco blog, her Brook Cowl design is a beautifully cosy crochet cowl that’s been super popular, and for very good reasons! And I am really pleased to welcome her back with this stunning crochet blanket pattern.
As this is a guest post, Bella Coco Crochet is unable to answer any queries. If you have a question, please contact the designer directly and they will be happy to help you.
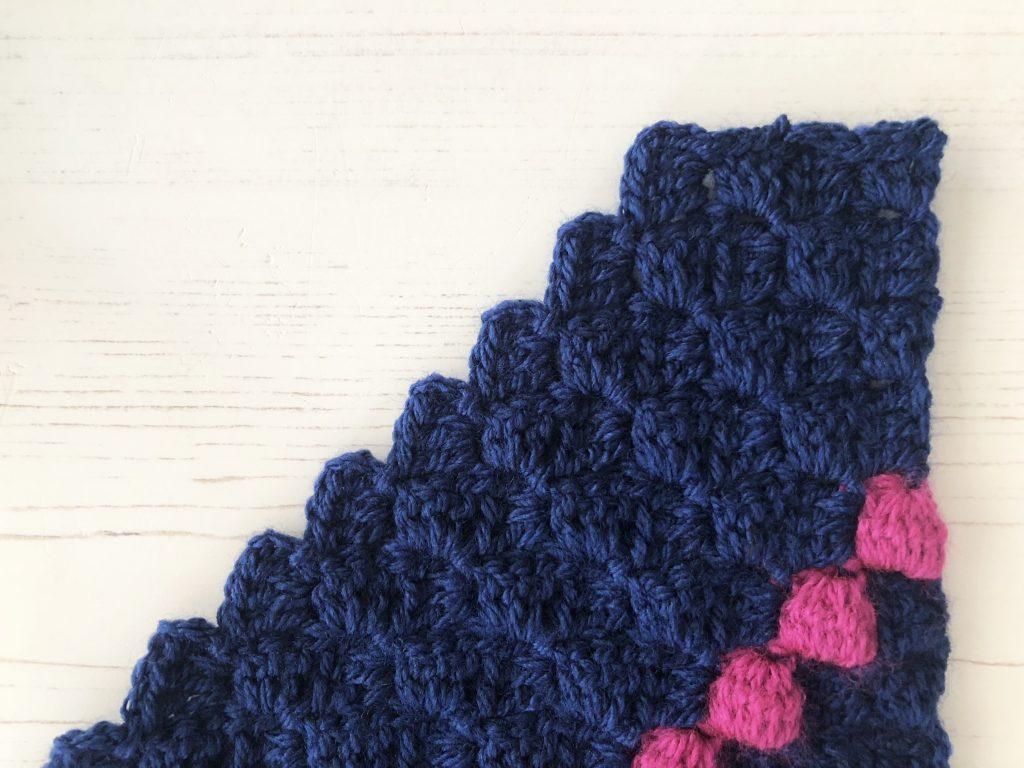
Hayley says, “The corner to corner stitch is perfect for blankets. Worked diagonally, this rhythmic stitch pattern works up fast and creates texture by joining blocks of treble crochet stitches. The rows of bobble stitches and pom poms add a fun pop of colour to this rectangular c2c blanket. If you are new to corner to corner crochet you can refer to the Bella Coco stitch library for more info and video tutorials. I hope you enjoy making the blanket.“

MATERIALS & TOOLS
Yarn: Paintbox Yarns Simply DK in:
Midnight Blue MC (5 balls)
Raspberry Pink CC1 (1 ball)
Tea Rose CC2 (1 ball)
Marine Blue CC3 (1 ball)
Pansy Purple CC4 (1 ball)
Hook: 4mm
Darning needle
Scissors
Pom pom maker (optional)
SIZE
Tension is not critical for this project
Finished size blanket measures approx. 30×38 inches
NOTES
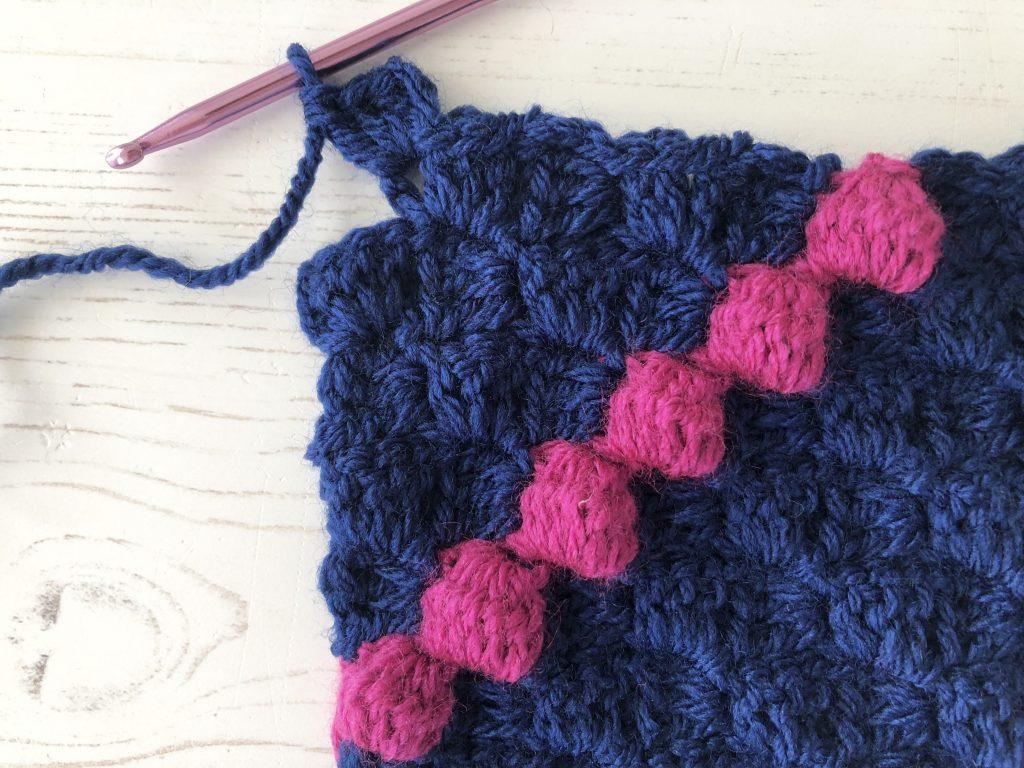
Bobbles worked on WS rows, will appear on RS of work
To adjust sizing simply use more or less pattern repeats where indicated
Pattern written in UK terms
TERMS & ABBREVIATIONS
Chain (ch): Yarn over, pull through.
Treble Crochet(s): tr(s): Yarn over, insert into stitch, yarn over, pull up a loop, you will have three loops on the hook. Yarn over, pull through two loops, yarn over, pull through remaining two loops.
Make bobble (MB): make bobble stitch by working tr7tog in the same stitch
Slip stitch (sl-st): Insert hook, yarn over, pull through both stitch and loop on hook.
Space (sp)
Stitch(es) (st/s)
SPECIAL STITCHES
The bobble stitches are made on wrong side rows by working tr7tog in one stitch or space. You’ll insert hook, yarn over and pull through 2 loops, seven times in total (until you have 8 loops on the hook) then pull through all loops on the hook to create one bobble. Work a slip stitch into the space where the bobble is to be worked, chain 3 and work tr7tog then repeat this for the rest of the row.
Unsure of the differences between UK and US terms? Need a refresher on how to do your stitches? In my ‘How to crochet: A handy reference guide’ EBook I help you with all of these terms and you can always have them to hand! You will also get exclusive access to free video instructions. Learn more about the eBook here.
If you LOVE Blankets, I think you’ll enjoy these posts too:

And many, many MORE. Which you can view here.

BOBBLE C2C BLANKET PATTERN
Unless instructed to fasten off you can change colour by completing the last treble crochet of the previous row using the next colour. Use the next colour to complete the last ‘yarn over and pull through 2 loops’ to complete the stitch so the right colour is ready to use for the next row.

Increase Section
Using MC
Row 1. Ch6, tr in 4th ch from hook, tr in next 2 chains, turn.
Row 2. Ch6, tr in 4th ch from hook, tr in next 2 chains, sl st to top of next block (sp below the 3ch) ch3, 3tr in same sp, turn.
Row 3. Ch6, tr in 4th ch from hook, tr in next 2 chains, *sl st to top of next block (sp below the 3ch) ch3, 3tr in same sp, repeat from * to end, turn
Row 4-7. As row 3

Change to CC1
Row 8. Ch3, MB in next st, sl st to sp between next st and the 3ch, ch3, MB in same sp, *sl st to top of next block (sp below the 3ch) ch3, MB in same sp, repeat from *to end, turn.

Change to MC
Row 9. Ch6, tr in 4th ch from hook, tr in next 2 chains, sl st to sp between the bobble st and the 3ch below, ch3, 3tr in same sp, *sl st to next block (sp between next bobble st and the 3ch) ch3, 3tr in same sp, repeat from * to last block, sl st to top of last bobble st, ch3, 3tr in same st, turn.

Row 10-15. As row 3
Change to CC2
Row 16. As row 8
Continue increasing by repeating rows 9-16 four more times using MC for 7 rows of regular corner to corner stitch followed by 1 row of bobble stitches using CC3, CC4, CC1, CC2 in turn. Use less pattern repeats for a narrower blanket or add more repeats to make your blanket wider then begin the decrease section as below.
Keep slip stitches on the decrease section fairly loose to keep your edges nice and straight, you may wish to use a stitch marker to indicate which row edge you’re decreasing on.
Decrease Section
Change to MC
Row 1. Ch6, tr in 4th ch from hook, tr in next 2 chains, *sl st to next block (sp between bobble st and the 3ch) ch3, 3tr in same sp, repeat from * to last block, sl st to top of last bobble st, ch3, 3tr in same st, turn
Row 2-4. Ch6, tr in 4th ch from hook, tr in next 2 chains, *sl st to top of next block (sp below the 3ch) ch3, 3tr in same sp, repeat from * to end, turn
Row 5. Sl st in sp between next 3 sts, ch3, 3tr in same sp, *sl st to top of next block (sp below the 3ch), ch3, 3tr in same sp, repeat from * to end, turn
Row 6. Ch6, tr in 4th ch from hook, tr in next 2 chains, sl st to top of next block (sp below the 3ch) *ch3, 3tr in same sp, sl st to top of next block (sp below the 3ch), repeat from * to end, turn
Row 7. As row 5

Change to CC3
Row 8. Ch3, MB in next st, sl st to sp between next st and the 3ch, *ch3, MB in same sp, sl st to top of next block (sp below the 3ch) repeat from * to last block, turn and fasten off.
Join MC to sp below 3ch of last block
Row 9. *Ch3, 3tr in same sp, sl st to next block (sp below the 3ch), repeat from * to last block, sl st to top of last bobble st, ch3, 3tr in same st, turn
Row 10. As row 6
Row 11. As row 5
Rows 12-15. Repeat rows 10-11 twice more
Add in more repeats of rows 8-15 to make a longer blanket
Change to CC4
Row 16. As row 8
Join MC to sp below 3ch of last block
Row 17. As row 9
Row 18. As row 6
Row 19. As row 5
Row 20. As row 6
Row 21-22. As row 5
Row 23. Sl st in sp between next 3 sts, ch3, 3tr in same sp, *sl st to top of next block (sp below the 3ch), ch3, 3tr in same sp, repeat from * to last block, sl st to last 3ch sp, turn and fasten off
Join CC1 to sp below 3ch of last block
Row 24. *Ch3, MB in same sp, sl st to top of next block (sp below the 3ch), repeat from * to end, turn.
Join MC to top of bobble st
Row 25. Ch3, 3tr in sp below the 3ch, *sl st to top of next block (sp below the 3ch) ch3, 3tr in same sp, repeat from * to last block, sl st to last 3ch sp, turn.
Row 26-31. Sl st in sp between next 3 sts, ch3, 3tr in same sp, *sl st to top of next block (sp below the 3ch), ch3, 3tr in same sp, repeat from * to last block, sl st to last 3ch sp, turn, fasten off after row 31
Continue decreasing by repeating rows 24-31 five more times using CC2, CC3, CC4, CC1, CC2 in turn for the bobble stitch rows and MC for the regular corner to corner stitch rows. Repeat row 26 twice more or until you have decreased down to 1 block then fasten off and weave in ends.

Pom Poms
Using a large pom pom maker make 16 pom poms in total:
4x MC midnight blue
4x CC1 raspberry pink
4x CC2 tea rose
2x CC3 marine blue
2x CC4 pansy purple
Sew navy poms to each corner and the corresponding contrasting colours to each end of the bobble stitch rows to finish.

PIN FOR LATER


2 Comments
Lorraine Mills
September 5, 2020 at 3:16 pmHi, if I just wanted to make it in 2 colours, main colour and contrasting stripes how many balls of the contrasting colour do you think I need, I presume you didn’t use all of the contrasting colour yarn up?
BellaCocoTeam
September 7, 2020 at 5:59 pmHi Lorraine as this was a guest post you will need to contact the designer direct 🙂